Investigating the root cause of unexpected failures – whether a structural component, an electronic device, or a complex system ceases to function as intended – is the core mission of forensic engineering. While initial assessments often focus on visible damage and surface-level analysis, critical clues frequently lie concealed within materials or intricate assemblies. This is precisely where X-ray analysis emerges as an indispensable investigative tool.
What is X-Ray Analysis in Failure Investigations?
At its core, X-ray analysis in forensic engineering is about seeing the unseen. It’s a non-destructive imaging technique that uses X-radiation to peer inside objects without damaging them. By passing X-rays through a material, a shadow image, or “radiograph,” is created on a detector. Modern techniques, like Computed Tomography (CT), build on this by taking multiple X-ray images from various angles to construct a detailed 3D view. The principle is straightforward: dense materials absorb more X-rays, appearing brighter in the image, while less dense materials allow more X-rays to pass through, appearing darker. This contrast allows engineers to differentiate between various components and materials, and importantly, to spot anomalies.
Why is this Method Crucial in Certain Investigation Scenarios?
The strength of X-ray analysis becomes particularly evident when traditional examination methods fall short. It’s an essential measure in situations such as:
- Probing Internal Weaknesses: Many failures originate from internal flaws – hairline cracks, tiny air pockets (voids), or foreign particles embedded during manufacturing. These hidden defects, invisible on the surface, are precisely what X-rays are designed to expose.
- Preserving Critical Evidence: When dealing with unique or vital pieces of evidence that must be kept intact for further testing or legal proceedings, X-ray analysis allows for internal assessment without compromising the object’s integrity.
- Inspecting Complex Internal Structures: Modern electronic devices, intricate mechanical systems, or multi-layered composite materials are often impossible to take apart without destroying them. X-rays provide a comprehensive internal map, verifying proper assembly, alignment, or identifying misplaced elements.
- Pinpointing Failure Origins: When a material fractures or a component breaks, the point of initiation is vital for determining the cause. X-rays can reveal the precise starting point and propagation path of internal damage, offering crucial insights about the forces involved.
- Assessing Hidden Deterioration: Processes like internal corrosion in pipes or a hidden build-up of fatigue damage within a metal component can weaken a structure from the inside out. X-rays can visualize and quantify such internal degradation.
What to Look For: Interpreting X-Ray Images for Defects
Analyzing an X-ray image in a forensic context requires a sharp eye and knowledge of material properties and manufacturing processes. Investigators typically look for:
- Unexpected Gaps or Inclusions: Look for dark, irregular voids within solid materials, or conversely, bright, dense specks that shouldn’t be there. These could signify casting defects or foreign material contamination.
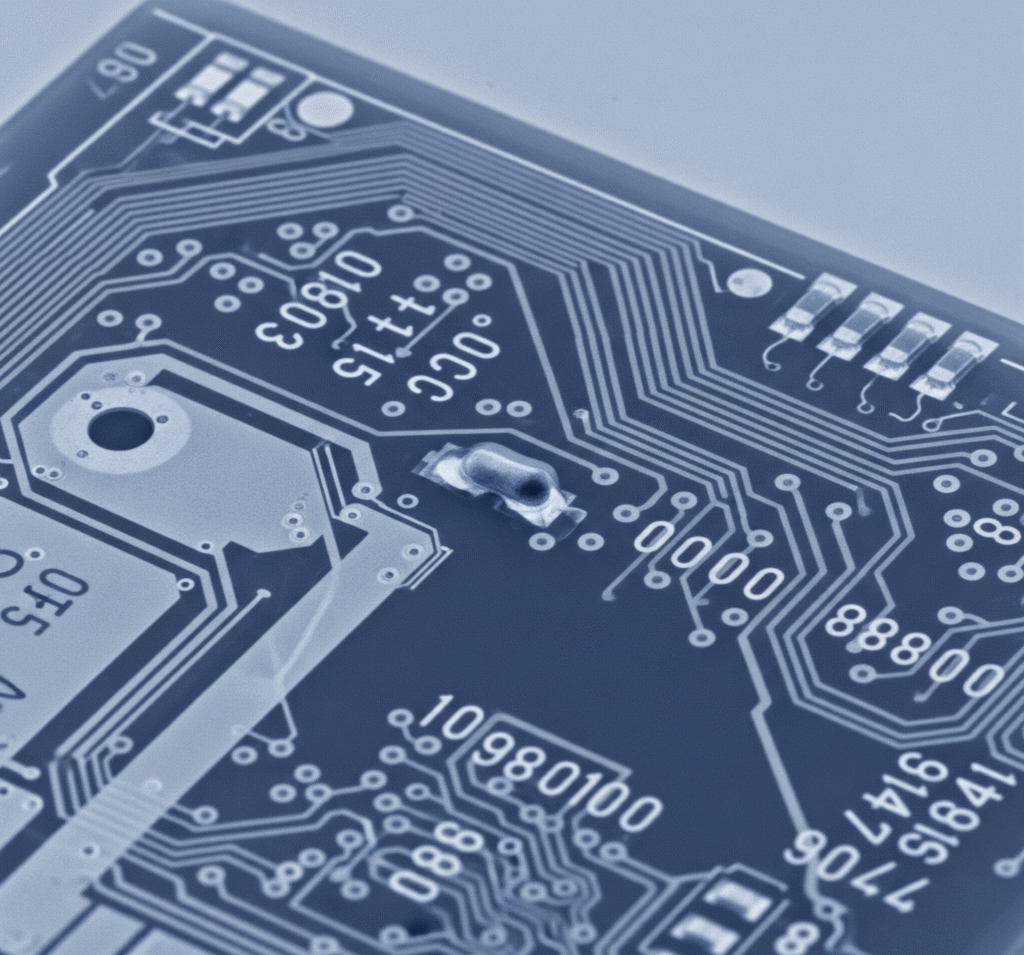
- Unintended Connections: Especially in electronics, a bright, irregular “bridge” of material connecting two normally separate conductive pathways or component leads signals a solder bridge – a common short circuit. Similarly, any bright metallic fragments unexpectedly bridging connections are clear indicators of trouble.
- Abnormal Density Transitions: Sharp, linear changes in density (appearing as distinct bright or dark lines) can indicate cracks. The nature and orientation of these lines provide insights into how a fracture might have developed.
- Distorted or Misaligned Features: Comparing the X-ray image to design blueprints or a reference “known-good” sample can quickly highlight components that are bent, out of place, or not properly seated.
Common Failure Types Revealed by X-Ray Inspection:
While not all failures leave distinct X-ray signatures, many critical failure types can be identified or their contributing factors revealed through this method. Some examples include:
- Manufacturing Imperfections: These include internal cracks from cooling or processing, porosity (small holes) in castings or welds, incomplete fusion in welded joints, or the inclusion of foreign substances within the material. For electronic boards, this often means detecting issues like insufficient solder, solder voids, or the notorious solder bridge short circuits.
- Material Degradation: X-rays can show the progress of internal corrosion, where material has been eaten away, or visualize the internal fracture patterns indicative of fatigue, impact damage, or thermal stress.
- Assembly and Installation Errors: Detecting components installed incorrectly, missing fasteners within an enclosed assembly, or unintended physical contact between internal parts that could lead to wear or shorting.
Conclusion:
X-ray analysis stands as a crucial non-destructive testing technique in the forensic engineer’s toolkit. Its ability to provide an non-invasive “look inside” materials and assemblies makes it invaluable for uncovering hidden defects, understanding how failures occurred, and ultimately determining the root cause of incidents. By meticulously examining X-ray images for discontinuities, density variations, geometric anomalies, and evidence of damage, forensic engineers can gain vital insights that would otherwise remain invisible, leading to more accurate and comprehensive investigations. As technology advances, the resolution and capabilities of X-ray imaging continue to improve, further solidifying its importance in the pursuit of understanding why things fail.
Can you spot the anomaly in the header image (the first X-ray image of the electronic board)?
Have an electronic failure? We can help to detect the cause.


